20 Aug 2011

Lasagna Recipe

When I was growing up, I never really had a good dish of lasagna. Well I did but on rare occasions and when I did, it was a delicious treat. I've always wanted to learn how to make them but it all seemed too complicated for a younger 'I don't really care for cooking' me. While I was dating hubby, I discovered an unknown passion for cooking and to my mothers delight, she shared her secrets and recipes with me to cook for hubby, who fell in love with our local dishes. I think hubs was more excited about the food than the fact that he would be marrying a wife who was soon to be addicted to cooking!

So after the wedding, before I was leaving to Sydney to be with hubs, mom took me out to shop and she came upon recipe books half price! Score, mom! So she bought me 3 The Australian Women's Weekly recipe books and to my giddy delight, there was a recipe for lasagna! Can't wait to try that!


So I left (cue the tears) and went off to start a new chapter in my life. Took me a while to gather up some courage to try and cook this dish. As I was fresh of the block, hubs was there with me the whole way, guiding me. It turned out pretty good and I started cooking it with more confidence, cooking it for friends and family. One friend, who I affectionately call my 'son', was skeptical when I cooked for him and his 2 precious daughters this dish for dinner. He had bad experiences with lasagna. It was either pub or frozen lasagna. Well I changed his mind alright! He had 4 servings!

This recipe has been tweaked a little according to the mince that you are using. I use beef mince so some ingredients is halved. I will put in the original recipe with notes of my tweaked recipe alongside the ingredients stated. I also used the white sauce recipe in the my Cheesy Potato Bake Recipe.


Main ingredients :
  • 1 tbs oilve oil
  • 1 med brown onion, chopped coarsely
  • 3 stalks celery, trimmed, chopped coarsely
  • 4 cloves garlic, crushed
  • 2 tsp ground cinnamon ( pork and veal mince ), 1 tsp ground cinnamon ( beef mince )
  • 800g pork and veal mince ( I prefer to use beef mince )
  • 1 tbs plain flour
  • 2 tbs red wine vinegar
  • 2 tsp brown sugar ( pork and veal mince ), 1 tsp brown sugar ( beef mince )
  • 700ml bottled tomato pasta sauce/passata
  • 400g can diced tomatoes
  • 1/4 cup finely chopped fresh sage
White sauce ingredients :
  • 40g butter
  • 2 tbs plain flour, extra
  • 2 1/2 cups ( 625ml ) hot milk
  • 1 1/2 cups ( 120g ) finely grated Parmesan cheese
  • 2 1/2 cups ( 250g ) coarsely grated mozzarella cheese
Extra ingredients :
  • 250g fresh lasagne sheets
  • 12 fresh sage leaves ( I find this optional. There's no difference in the taste if you decide to not put it in. The chopped sage is enough for me )


  1. Heat oil in large saucepan; cook onion and celery, stirring; until soft. Add garlic and cinnamon; cook, stirring, until fragrant.
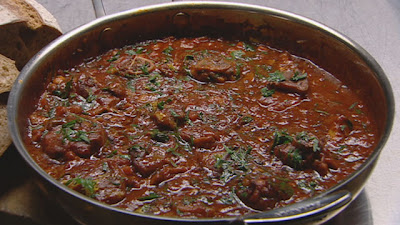
  2. Add mince; cook, stirring, until meat changes color. Add flour; cook, stirring, 1 minute. Stir in vinegar, sugar, pasta sauce and undrained tomatoes; bring to boil. Reduce heat; simmer, stirring occasionally, about 15 minutes or until sauce thickens. Stir in chopped sage.
  3. Preheat oven to 180C/160C fan-forced. ( I do this before I start cooking to make sure the oven is nice and hot! )
  4. Meanwhile, melt butter in medium saucepan. ( Don't burn it like I did the first time I made this! ) Add extra flour; cook, stirring, until mixture thickens and bubbles. ( To be safe, do this on low heat first ) Gradually stir in milk; stir until mixture boils and thickens. ( Increase heat to medium while stirring mixture ) Remove sauce from heat; stir in one-third of the Parmesan. ( Sauce should be creamy and thick. If your sauce is still water-like, before stirring in Parmesan, put back on heat and keep stirring until thick )
  5. Spread quarter of the meat sauce into shallow 20cm x 31 cm oven proof dish. Cover with one-third of the trimmed lasagne sheets, then one-third of the remaining meat sauce, half the white sauce and half the mozzarella. Make two more layers with the remaining lasagna and meat sauce; top with remaining white sauce then sprinkle with combined remaining cheeses. Sprinkle with sage leaves. ( If you decide to add this ) Cook, uncovered, in oven, about 50 minutes ( Keep checking on it because usually by 30 minutes, its ready ) or until browned lightly. Stand 15 minutes ( Or in the case of my home, 2 minutes. Boys usually have their hungry hands cutting it up by the time I take it out! )
Tips :
  • The great thing about lasagne is you can either make both sauces a day ahead, then assemble the lasagne when you're ready, or completely finish the lasagne a day ahead, put it in the refrigerator and reheat it in the oven ( 180C/160C fan-forced ), covered, for a bout 30 minutes. or, if you like, freeze the finished lasagne, as a whole, or in serving-sized portions. The whole lasagne will take about 24 hours to thaw in the refrigerator. Individual portions can be thawed in a microwave oven - follow the manufacturers directions.
  • Pizza cheese ( 375g ) is a good substitute for the Parmesan and mozzarella in this recipe.


So there it is. I hope you, the fresh of the block cooks out there, find the courage to cook this dish like I did. Practice makes perfect! Took me a while to perfect this dish and the white sauce. Especially the white sauce! So do try this dish and if you have any more tips or if you cooked it with an extra ingredient, let me know. Would love to try it! Also let me know if you need any advice on this dish. More than happy to help out a fellow lasagne lover!

xoxo

10 Aug 2011

Perfect nails without going to the salon.

Yesterday I decided that today I want to channel my inner Dorothy. Well more of the reason that I bought a nail polish called Ruby Shoes by N.Y.C Color.


You wanna take a guess how much this awesome bottle costs? Just 2 dollars!!!! What a find! Right about now, you might be thinking, "Well it could be 2 dollars but how am I going to get that perfect salon nails? I still have to fork out 40 dollars or more to do my nails."

Well don't fret my dearies! The ever sneaky, cheaty Mrs. Williamson is here to save the day! And money ;)

When I was younger, my brother use to date this girl who knew every cheat and secret in putting on flawless makeup, skincare, hair styling and how to put on nail polish without stepping out of the house. She was a genius! And she taught me everything which I am forever grateful. I kept the secrets for a long time and no one ever seem to know how I never spent money but always somehow put on makeup, did my hair and nails like I just stepped out of the salon 5 minutes ago. Well today, I have decided to share the secret. Before you start screaming and jumping in joy, I'm just going to share just the nail secret for now. Yes I know, it may seem a little mean but I assure you, I will be sharing a lot more in the future!

So here are the things you will need :

  • nail file
  • base coat or a buffer
  • top coat
  • nail polish of your choice

That's it! Unbelievable isn't it?

So for the base and top coat, I like to use Sally Hansen Double Duty because instead of buying 2 separate bottles, this hot momma acts as a top and base coat all in one bottle. Perfect!

The base coat is great before you put on the nail polish. This is so that the nail polish will have a nice smooth finish when you put it on. Another alternative is to buff the ridges ( those bumpy things you sometimes get on your nails ). I prefer the base coat. Here is a website I found that will tell you all about how to file and buff your nails. Make sure that you wash your hands after filing and buffering, otherwise your going to get nail dust under the nail polish. I usually do this a day before applying nail polish.

Now to make this work, it is vital that you do this a few hours before you hit the sack. When you are ready, apply base coat ( if you decide to use this ) on dry, bare nails and let dry. Once dry, apply nail polish. Now here's the secret, While applying, don't try to be a perfectionist, trying to not get the nail polish on your skin. Just apply it all over! With this method, you will get your nail polish on the sides of your nails. Apply 2 coats and let dry. At this point, your fingers are going to look like a train wreck on nails but don't worry, it may look horrid now but I promise you, the outcome will be fabulous!

Once nails is dry, snooze away. Next day, while taking a shower, pick the nail polish on your wet skin and watch the magic as the nail polish comes off! Now you can gaze at your perfect nails! After your shower, once dry, apply top coat and let dry. Voila! Perfect nails without even stepping out of your house!


I hope this helps women out there who are on a budget and want to have a polished, perfect nails without breaking your budget. Do let me know if you've tried this method and have helped or if you have any tips and tricks. Would love to try them!

xoxo

9 Aug 2011

The big 3-0!

July 16th 2011 - the day I turned 30. To be honest, I thought I would have rolled around, cried and screamed "Why God? Whyyyy?!?!?!?!" But instead, I faced the day with a smile and a kiss from hubs and Moe. Turning 30 ain't so bad. I wonder why most women make such a big deal about turning the so called "big 3-0". Hubs took me out for a nice Spanish dinner and drinks after. He organized a get together with friends a week later. It was just another birthday.

Throughout my life, I have been through the good, the great, the bad and the worse.I've worked hard, quit because I didn't want to work, got fired because I didn't work, lazed around because I had no job, struggled to get money, starved because I had no money, pigged out when I had money, went through bad relationships, had great relationships, had my heart broken, broken a few hearts, screwed up a friendship, mended a friendship, learned who were my true friends, learned who was my true enemy, gained weight, lost weight, moved out of parents house, moved back in to parents house, lost my father, grandma and aunt, and most important of them all, I married my one true love.

From all this experience ( and lots more ) I have learned that even though I don't have much to show for now, I have found stability, love, courage and more in my friends, family and hubs. Turning 30 and looking back, I don't regret anything I've done, and I sure as hell am not going to slump around, whinging about turning 30. I've had a great life and I'm going to continue having a one. So I'm still baffled as to why women still complain. Well whatever the reason may be, I reckon that everyone should just be celebrating each birthday, no matter at what age, knowing that with each year that has passed, they have achieved something and have had special memories to cherish. We should be celebrating! Not contemplating or regretting.

Can I hear a "Woot Woot!"?

xoxo

8 Jul 2011

Upcoming Project


It has been a while since I've blogged about anything that's been going on. Well that's because nothing has been going on in my end. Just been working, cleaning and basically just been researching on projects I'm interested in doing. It has been a chilly winter and its going to get colder according to the weather girl. Brrrr!!!

For the past month, I've been collecting toilet paper roll for 2 projects I had in mind and mind you, I had weird looks and comments from the husband and from our housemate when I told them to NOT throw the toilet paper rolls away! This will be one project that will be good since it will be indoor and away from the cold! I'm waiting on my art table (which is actually our trestle table we stored away at my MIL's house but I like to be fancy!) to arrive so I could start.

At this point you are probably wondering, "Why don't you just use an office table or a dining table?" So here is the story. My husband bought this apartment a year before we met and well, being the bachelor that he was, he didn't think that getting a dining table or an office table would make any sense. Hes got a coffee table to eat off and a trestle table (which is the one that's being stored away) for his turntables and he's all good! So after we got married, I moved to Sydney and slowly we are decorating the apartment. FYI, furnitures are NOT cheap here in Sydney! And it was then I found my passion for DIY and interior designing. So we used the trestle table for our Sydney wedding and we kept it at my MIL's house since it was quite a hassle to bring it home. A month after the wedding, we went to Ikea and got a new table for the turntables and decided, we don't have space to put the trestle table in the apartment. Now we do so that will be my temporary art/office table. Well once it gets here that is.....

So here are 2 pictures of the projects I had in mind. Of course I will put my own little twist in it. I will definitely put up step by step pictures when I do it. If you decide to do it, then you at least have a picture guide.


|| flowers on canvas ||

|| pen holder ||


xoxo

20 Jun 2011

Veal Osso Bucco with Cannellini Beans Recipe


Yesterday was the day that I tried cooking a dish I never thought I would ever cook in my life! The Osso Bucco. hubs and I watched an episode of Masterchef Australia and Gary Mehigan was cooking his version of osso bucco. Now for those of you who don't know what osso bucco means, it means 'bone with a hole'. Osso = bone, Bucco = hole. So as we watched Gary cook the dish, we knew this was one dish we had to try or actually, more like a dish I had to try cook. We were salivating by the time Gary took it out from the oven.

We already did our shopping last week so all I had to do was just prep and cook and shove the pot in the oven. One problem. I did not understand the recipe. There were cooking methods missing and ingredients stated but was not stated in the methods. It has been a long day today for us and there is nothing more I would love to do than to link you to the recipe but since the recipe is not complete, I feel it is my duty to state the right methods to cooking this beautiful dish. So here it is :


Ingredients :
  • 1.5kg bobby veal shin, cut 2.5cm thick (about 12 pieces)
  • 1 cup plain flour
  • 100ml olive oil
  • 2 stalks celery, diced
  • 1 medium onion, diced
  • 1 carrot, peeled and diced
  • ¼ bunch parsley stalks, leaves picked and roughly chopped, stalks reserved
  • 4 cloves garlic, roughly chopped
  • 3 cups white wine
  • 2 tablespoons tomato paste
  • 1 bay leaf
  • 6 sprigs thyme, leaves picked out
  • Zest of 1 lemon
  • 400g tin crushed tomato
  • 3 cups veal stock ( alternatively you can use chicken stock, which is neutral to bring out the taste of the veal )
  • 100g dried cannellini beans, soaked overnight ( if you choose to use beans from a can, make sure you wash the starch away )

To finish :
  • Freshly cracked white pepper and sea salt
  • ½ bunch parsley leaves, roughly chopped
  • Zest of 1 lemon
  • 1 loaf crusty bread, thickly sliced


  1. Preheat oven to 180⁰C.
  2. Season meat with salt and white/black pepper, coat with flour then shake off excess.Heat oil in a frying pan, add meat, keep adding olive oil so not to burn the veal and panfry until caramelized. Put aside on plate.
  3. In the same pot, add celery, onion, carrot, reserved parsley stalks, garlic. Add more pepper (optional), thyme and bay leaf. Cook for 10 minutes.
  4. Add tomato paste and cook for 1-2 minutes and deglaze with wine. Scrape the bottom and cook for 1-2 minutes or till alcohol is evaporated.
  5. Add crushed tomatoes, thyme, parsley, lemon zest, stir then add the stock.
  6. Stir to mix then add in the veal and cannellini beans.
  7. Cover with lid, put in oven and cook for 1 1/2 - 2 hours.
  8. Remove lid, check if sauce is to your liking. ( I like mine a little watery than thick ) If you prefer it thick and its watery, cook with lid removed for another 45 minutes in oven or until sauce has thickened.
  9. Remove from oven. Spoon the veal and you know its perfectly cooked when the meat falls from the bone.
  10. Sprinkle with cracked pepper, sea salt, chopped parsley and lemon zest.
  11. Serve with crusty bread.


The ingredients isn't exactly like Gary's but the method is. I cooked it according to the recipe and although it turned out very nice, the sauce was a little thick. So I added another cup to the white wine and stock to make it a little more saucier. So there it is. A traditional, delicious osso bucco fit for a warm night in winter. I hope to hear from you if you decide to cook this dish.

Oh, I forgot to mention that with this dish, it is a must that you be VERY VERY VERY careful when handling the VERY hot pot. I can't stress enough how dangerous cooking this dish can get. I would know since I burnt myself twice, on the same hand, while making this dish! Hubs called me the clumsy chef because I just to happen to either cut or burn myself while cooking...somehow. It is also advisable to have your children attended to when handling this dish.

I would love to hear your comments on this dish and if there are any other way you have cooked this dish or added an extra ingredient, let me know. Would love to try it!

xoxo

15 Jun 2011

Shepherds Pie Recipe

When I was younger, my aunt use to cook this massive dish of shepherds pie for me and it was the highlight of my week every time she came over to drop it off. I would just sit in front of the TV with a big plate of steaming shepherds pie, big grin on my face and scoff it all down. Usually I would try to span out the massive dish in a week but I always end up finishing it off within days! It was THAT good!

This week, one of our dishes was shepherds pie which I cooked for dinner tonight. Hubs knew which recipe he wanted me to cook which was Gordon Ramsay's (my fav chef!) shepherds pie served with pan roasted carrot. Gulp! Gordon Ramsay's recipe?! This man is famous for screaming "Get back in there and cook it, you useless donkey!" to those who would cook his famous dishes wrong! I know he's not here to scream that at me but I cant help but feel that if I do cook it wrong, he's going to appear from nowhere and just start screaming at me! LOL!!! So hubs found his recipe and forwarded it to me. As I was reading it, it was actually quite easy! All this time, I thought just cooking a normal shepherds pie was hard let alone cook a world famous chef's recipe but it was straightforward and lots of flavor! YUUUMMM!

|| not a picture of my cooking ||

As promised to my dearest friend Naomi from liebe.love I would post pictures of what I cook and recipes along with it buuuuut feeding 2 very hungry men in the house proves that sometimes its just a little hard to take a picture once you've taken out the dish from the oven. Yes that's right! They made a beeline for the dish the second I took it out before I had the chance to say "Let is rest." So anyways, here is the link to the recipe. Let me know how it goes if you decide to cook this dish. Would love to hear from you! I know I enjoyed it and I know the boys DEFINITELY enjoyed it!

xoxo

10 Jun 2011

3 things every wife MUST have!

When I was single or to be honest, dating someone but not really thinking about marriage, I always said to myself that I probably won't be one of those wives who would cook, clean or do the laundry. I lived quite a pampered life where my maid (bless her heart!) did everything in the house. I don't remember much of how I actually survived NOT doing most of this stuff when I was living away from home. Well I did send the laundry to the cleaners and just got them to do it! Teehee.....so it was given that I thought that by the time I get married, I would just hire a maid! How wrong I was.....

When I started dating my husband, it all changed. I became this clean freak who loves to cook and just wanted to be the perfect, sometimes neurotic, wife. Realization dawned and "Wow, I've grown up! About freaking time!" And so began the journey of cooking, housekeeping and experimenting with various cleaning products. This journey would conclude that I love garlic, vacuuming and watching grease and dirt disappear! And now the piece de resistance.....


3 THINGS EVERY WIFE MUST HAVE!
  • Vinegar
  • Baking soda/bicarbonate soda
  • Lemons


These 3 things are my lifesavers! I would sit and wonder how did I ever went through life not knowing what these wonderful ingredients can make life so simple especially for cleaning! My pantry is literally stocked with them. For cleaning tips, click here. Please drop a message if you have any other tips on using these 3 ingredients for cleaning or anything! Would love to hear from you!

xoxo

2 Jun 2011

oopppsss....

It has been a while since I last blogged about anything and I do apologize! I HAVE been lazy due to the weather...(not use to the cold blistering autumn/winter)....Hey, what do you expect from a girl who lived in a tropical country her whole life?! Oh, and not forgetting the crappy laptop I have right now! I always have to wait till hubby gets home to blog and by that time, I would have been too tired from cooking, cleaning and entertaining to blog. Oh well, still not an excuse to NOT blog! Maybe I should make my life more interesting to actually blog about something besides cooking, cleaning and making faces at my husband and cat.


O.O

xoxo

2 May 2011

What should I do?????

On Saturday, hubby and I dropped by my mother-in-law's house to drop off some stuff and we got to discussing about hubby's grandmas birthday this coming Friday. Since grandma is driving down, MIL is cooking dinner so we decided that I will cook a dish too. So we decided, grandma loves lasagne, so I'm going to cook lasagne and MIL is going to cook risotto. Hmmmm love MIL's risotto.

Today, I decided that I might make them a present too! So I've just been brainstorming thinking what project I can do and was discussing it with hubby. He lovingly said that we should bake them some cupcakes or maybe a cake. And I thought it was a brilliant idea. So I rambled on what I could bake and flavors. Then I stopped and realized, wait a minute. I turned to hubby and said :

"Did you want me to bake for them or for them AND for you?"

Hubby just grinned his cheeky grin and said :

"For both?" Yeah right!

So anyways, I'm still thinking of what project I should start. I'm definitely going to be baking the cupcakes so watch this space for the recipes, methods and pictures. But I am itching to do a DIY project! Hmmmmm.....people love presents right? So no harm in making lots of presents! Teehee.....

xoxo

28 Apr 2011

Cheesy Potato Bake Recipe

Today, hubby and I cooked BBQ and cheesy potato baked for dinner. So hubby being the man that he is, he did the BBQ and I went on cooking the cheesy potato bake. I've cooked this dish before but it did take me a while to perfect the bechamel sauce or some people might call it white sauce but I just love saying bechamel! Now I know bechamel sauce is usually used for lasagne or sformati but I thought why not use it with a potato bake. Plus it would have been a good compliment to the meat and lamb hubby was cooking up. So here is the recipe for the meat marinate, lamb marinate and the cheesy potato bake.


Beef marinate :
  • Garlic salt
  • Pepper

Yes I know. It's as simple as that! Make sure that you coat the meat and marinate for about 2 hours before you cook it. Its better if you marinate it the night before so that the flavors will be infused with the meat.


Lamb marinate :
  • Honey
  • Rosemary

Again, its that simple! And again, marinate for about 2 hours or marinate the night before.


Cheesy Potato Bake :
Ingredients :
  • 60g butter
  • 1/4 cup plain flour
  • 2 1/3 cups milk
  • 2 cups grated mozzarella cheese
  • 2 cups parmesan cheese
  • 1.2kg Sebago potatoes, peeled, thinly sliced
  1. Preheat the oven to 180"C. Grease 6cm deep, 24 cm square baking dish.
  2. Cook sliced potatoes in boiling water for 2 minutes or until potatoes are a little soft. Drain potatoes.
  3. Meanwhile, melt butter in medium saucepan. Add extra flour; cook, stirring, until mixture thickens and bubbles. ( To be safe, do this on low heat first ) Gradually stir in milk; stir until mixture boils and thickens. ( Increase heat to medium while stirring mixture ) Remove sauce from heat; stir in one-third of the Parmesan. ( Sauce should be creamy and thick. If your sauce is still water-like, before stirring in Parmesan, put back on heat and keep stirring until thick )
  4. Arrange one-third of potatoes, overlapping slightly, over base of baking dish. Sprinkle with salt and pepper. Spoon one-third of the cheese sauce over potatoes. Repeat twice. Sprinkle with remaining mozzarella cheese and Parmesan cheese on top. Put in oven at bottom grill. Bake for 30 minutes to an hour, or until top is golden. If top begins to brown too much, cover with foil.

Just follow these tips in making this dish and making the béchamel sauce/white sauce and you will NOT fail in impressing your guests, family or your loved ones. It has taken me a while to perfect this sauce and not to toot my own horn, but I am quite proud of this sauce. Once you have gotten the method down to pat, you will be able to use this sauce for your lasagne, potato bake, sformati or to compliment your meat dish. I hope you enjoy this dish and good luck! Don't forget, have fun, enjoy cooking, enjoy food and spread the love! I hope to hear from you soon!

xoxo

26 Apr 2011

Minestrone Recipe

Today, hubby and I woke up to a very affectionate Moe who just had to sneak in our morning snuggle. He was VERY keen! So we got up and went on with our morning routine and as I walked out to the living room and opened the blinds, I realized, its quite a cold muggy day! Hmmm if autumn is going to be this bad, I better prepare myself for a very cold winter. My sinus doesn't do well in cold weather. Love it!...but my nose doesn't.

So as hubby and I sat down and watched the news, I decided, on this cold day why not pick ourselves and our bodies up with a little homemade, hot minestrone soup. No doubt hubby cracked a huge smile and agreed so off we go to the supermarket to get ingredients. Of course before that, I did my research for recipes and found a great one! The soup is simmering so I thought why not share the recipes for all minestrone lovers out there.


Ingredients :
  • 2 tsp olive oil
  • 1 brown onion, finely chopped
  • 2 garlic cloves, crushed
  • 2 celery sticks, trimmed, finely chopped Compose
  • 2 carrots, peeled, finely chopped
  • 1.5L (6 cups) chicken stock
  • 700ml btl passata (tomato pasta sauce)
  • 150g green round beans, trimmed, cut into 3cm pieces
  • 400g can borlotti beans, rinsed, drained
  • 2 zucchini, quartered lengthways,cut into 5mm pieces
  • 115g (1 cup) small pasta shells
  • Shaved parmesan, to serve

  1. Heat the oil in a large heavy-based saucepan over medium-low heat. Cook the onion and garlic, stirring often, for 5 minutes or until the onion is soft.
  2. Add the celery and carrot. Cook, stirring often, for 5 minutes or until soft. Stir in the stock and passata. Increase heat to medium and bring to the boil. Reduce heat to low and simmer for 30 minutes.
  3. Add the green beans, borlotti beans and zucchini, and cook for 5 minutes. Add the pasta and cook for a further 10 minutes or until the pasta is al dente. Season with pepper. (To freeze, see note)
  4. Ladle the minestrone among serving bowls and top with parmesan.

Notes :
To freeze: At the end of step 3, set the soup aside for 30 minutes to cool. Transfer to a large airtight container or divide among 6 airtight containers. Place in the fridge to chill. Label, date and freeze for up to 3 months.To thaw: Thaw overnight in the fridge.To reheat: Reheat the soup in a large saucepan over medium-low heat for 10-15 minutes or until heated through. Continue from step 4.

So enjoy this beautiful recipe. I know hubby and I will! And don't forget, have fun, share the love and enjoy everything around you.

xoxo

25 Apr 2011

Lest We Forget


Today, Australians and New Zealanders all over the world pay tribute to their past and present diggers who fought at Gallipoli in World War 1. These diggers were named ANZAC, an acronym of Australian and New Zealand Army Corps. Today an estimate 8,709 Australians and 2,721 New Zealanders died in honor for their respective countries. It is quite humbling for me to celebrate this day for the first time and its even more learning about it. It just goes to show how proud one can be of their country and how they would give up their lives to protect and serve.


On this day, in Australia and New Zealand, everyone commemorates this day by attending Dawn Service, a tradition held at the war memorials accompanied by thoughts of those who lost at war. Some travel all the way to Gallipoli to remember and some travel the footsteps of the diggers to see what they experienced on their travel from Australia to Gallipoli. Gives me goosebumps every time I think of all the diggers setting out on an adventure and it saddens me to think of how they felt leaving their loved ones behind, not knowing whether they will ever see them again.


So, lets raise our glass, put our heads down and remember those who have bravely fought and died for their countries. Lest we forget.

xoxo

22 Apr 2011

What a day!

WOW! What a day! Started off the day by walking to Victoria's Basement to do a little kitchen shopping with hubby. Bought some great stuff! I think I can say for everyone that when you go shopping for kitchen utensils and products, you just have that nagging feeling that you want to redecorate your kitchen and just buy everything! Well that was what I felt when I went into the shop. I just saw everything I thought I needed. But good thing hubby was there and not just me alone....hehe. I would have bought the whole store!

So we did a walk through and hubby being the sensible guy, he kept asking do we really need this, do we really need that and true enough, we really didn't! So we ended up getting stuff we actually needed like spatulas, containers, a loaf pan, garlic crusher, measuring cup and a small bake ware. So here's an advice to everyone.
  • Figure out what you actually need and would actually use when you're cooking in the kitchen
  • When you know what you want, always look for packages. Its cheaper and you can get more than if you buy separately.
  • Always try to look for 2 or more in 1 products.
  • Restrain yourself from buying big bulky products if you have a small kitchen because you can buy another product that serves the same purpose at half the size. Saves you space to store them!
  • When in doubt, don't compulsively buy, but try to do your research on the products you want. You might find it elsewhere with a cheaper price!

We found a box of containers and it was cheap. So we stopped and had a look and saw that its airtight containers! Ooooo....interesting. Now how do I do this? The containers are here, wheres the pump? Oh there it is. Lets try. Pump Pump Pump Pump....hunni, this looks very rude...and a kid walks by with his mum. Ooopppsss.....not something you want to do while your back is facing people or in front of your kids! DEFINITELY not in front of your friends who are dirty minded! LOL......

So once we were done, we walked back home. FYI, we thought it would be easy, but carrying big bulky stuff back home is NOT easy! Especially when you have to walk uphill! Phew...we made it home. Hubby and I just couldn't wait to open up our goodies. So we sat down, took a breather and ripped into our new kitchen addition. It was satisfying knowing we bought everything we needed!

We had to rush to the bank to pick up my new debit card and walking in the bank, I smelled something pastry like and it smelled delicious and mouth watering. Mind you, hubby and I haven't had anything to eat. Once we were done, we walked out and true enough, there was a bakery next to the bank. Yuuummmm! Oh well, we went to Mexican takeaway and had a snack. We didn't want to fill ourselves too much as we had dinner later.

It was THE dinner hubby and I have been waiting for. Its this Lebanese restaurant our friend has been raving about. It would be quite a drive but she and her fiance said it was worth it. After Mexican, my sinus started acting up real bad so we had to make a short stop to the chemist to get some sinus medicine. Off back home and I popped 2 pills. It did help but made me sleepy. Oh oh...not good!

Oh well...as soon as my head hit the couch....zzzzzzzzzzzzzzzz. Before I knew it, I had to get up and get ready. My sinus was better and I was ready to hit the Lebanese challenge! It was quite a drive and by the time we got there, my tummy was a-rumbling! So was hubby! I have to say, it was worth the trip and cheap! I would DEFINITELY recommend Jasmin's in Punchbowl, NSW. Yes, yes it is quite a drive but I wouldn't say its worth it but if it's not worth it! Especially when you are accompanied by great friends!

As usual, after dinner, we had to have something sweet so off we go to Abla's, Granville. Hmmm....never tried Lebanese dessert before.YYYUUUMMMMM!!!!!! Back home now and snuggled a bit with hubby and our loving cat, Moe before I thought, you know what, I need to blog about this day. It was a sunny autumn day and we had such a GREAT day! I will end this blog with a word of advice, be sensible when shopping because you will end up with stuff you KNOW you will use and enjoy, enjoy food no matter how far it would be, always surround yourself with great, positive, fun friends and always love, love, LOVE those around you for no matter what happens in your life, they are the ones who will be there for you!

Have to go! Time for more snugglies with hubby and Moe. Sighhhhh.........

xoxo

20 Apr 2011

Kiki aka Vagina?

The vagina travelogue: RTA bristles at number plate's Tagalog translation


It had been a term of endearment which had cemented links with her Greek heritage and first adorned her cars more than five years ago following a loving gift from her husband.
But the nickname Kiki, given to lawyer Kristen Perry before she could even walk, has now put her in hot water with the Roads and Traffic Authority because her number plate also translates into a term for female genitals in the Filipino language of Tagalog.
''I rang my father last night and said: 'Do you know you have been calling me vagina all my life?','' she said.
''He just said 'What?' He was appalled.''
Mrs Perry has been left flabbergasted after being sent a ''please explain'', the RTA threatening to confiscate the number plate if she did not ''show cause'' within a fortnight.
An RTA spokeswoman said one person had complained that the plates were insulting to the Filipino language so Mrs Perry and another motorist, who also had ''Kiki'' featured, were issued notices.
''I have always been called Kiki by my family, many of my friends call me that,'' Mrs Perry said.
''I think it is just so funny.''
Mrs Perry said Kiki was a shortening of her name in the Greek language and the number plates were given to her by her husband, Steven, five years ago – first on a Mini before she upgraded to a Porsche.
And she did not take long to reply to the RTA.
''I have never been advised by anyone who speaks the Tagalog language that my name or number plate offends them,'' she wrote.
''... it has been my name since birth and your letter calling my name 'offensive' is disturbing.''
Mrs Perry said although some parts of the complaint were ''hilarious'' it was also ''really sad'' it had reached a stage where her plates could be taken.
The RTA spokeswoman said that ''by law, the content of personalized plates must not carry offensive language, religious or sexual content''.


Hmmmm.....Note to self : Never nickname your child Kiki!

xoxo

19 Apr 2011

Amatriciana Recipe


A pasta dish is always an easy and fast dish to serve up for your family. Me and hubby cooked this one night but with our own little twist. Here is the recipe if you feel like making Amatriciana dish without the complications of having too many ingredients.


Ingredients :
  • 1 medium brown onion (diced).
  • 3 cloves of garlic (diced).
  • 400 gram mince meat (the usual recipe calls for bacon but the halal version you can put in mince meat).
  • 1 red chilli (diced).
  • 1 can of crushed tomatoes (810 grams) or to your liking.
  • 500 grams;pasta of your choice.

  1. Boil water to cook the pasta. Cook according to the instructions on the packet.
  2. While waiting for the water to boil,heat up pan with oil. Once heated up,cook the onions till they soften.
  3. Then add the mince meat and cook till brown. Once brown,add the chilli and garlic. Cook for a minute or two.
  4. Add the crushed tomatoes and stir. Add more crushed tomatoes if you like it saucier. Leave to boil and reduce.
  5. Cook the pasta in the boiling water and once done, add the pasta to the sauce and stir.


    Serves: 4

    This is a dish that you can dish up for your family that is no fuss and not time consuming. Again, you can add ingredients that you think will go good with this dish. I am enjoying this dish and I hope you do to when you decide to cook this dish! So good luck and have fun!

    xoxo

    Pop Art on Canvas


    You will need:
    • 2-3 photos of high contrast
    • 4 Reeves clean edge canvas 10” x 10”
    • Reeves acrylics 75ml (Medium Yellow,Bright Red,Cobalt Blue,Grass Green & Mars Black)
    • Reeves Acrylic Brush Pack
    • Photographs (select a few to experiment with)
    • Carbon Paper
    • Reeves Sketching Set

    - Take your photos on CD (preferably saved as JPEG files) or on a digital camera memory card into a digital photo processing center and select your images on the photo terminal (or ask for assistance if required).

    - Select the ‘black & white’ option, then increase the contrast and reduce the brightness levels until you reach the desired effect. Ensure that the print outs of your photo are at least A4 in size.Place a sheet of carbon paper between the canvas and your now black and white image. Trace around the image with pencil. Remove the carbon paper to reveal an outline of your image.

    - Use the black paint to fill in the main image. Fill in the background with another color. Repeat this process another three times on the remaining canvases using different colored backgrounds. Now you have your own personalized set of images! Hang canvas from hooks in a 2 x 2 layout as shown.

    You don't have to buy the exact brand as I have stated. This is just more of a guide on how to start! You can use different colors or different pictures on each canvas. You can use whatever paint brand you are comfortable with. Just use your imagination with this project and most importantly, just have fun! Good luck and I expect to hear and see your finished project!

    xoxo

    Picture Perfect

    DO:
    Go for bright, solid color pieces in a shade that’s flattering against your skin tone. Prints may be hot property this season but it’s the block color trend that will shine in your special occasion snaps.
    “Solid colors look best in photographs, especially vivid or bright blues,” said Kerr. “Jewel tones are always a good idea (particularly sapphire and emerald). Just be sure to stay away from white, cream or even light beige, as these pale colors can make you look washed out in photos."

    DO:
    Stay away from high-cut necklines, especially turtlenecks.
    Beware of the perils of the poloneck. Cutting off your decolletage may look Parisian chic in the flesh but high necklines can have a funny effect in photographs, particularly if you have a short neck.
    “No matter how svelte you may be, a collarbone-covering blouse or dress will never look as flattering as something with a slightly lower neckline,” Kerr said.“A V-neck is an excellent choice for most people.”

    DO:
    Make sure your outfit is crinkle-free by choosing wrinkle-resistant materials. Steer clear of easily creased fabrics unless you’re happy to carry a travel iron in your handbag.
    “While linen is lovely, it will make you look like a crumpled dinner napkin on camera,” Kerr said. “Instead, look for sturdier fabrics like crepe, tweed or wool blends, as they don’t show wrinkles so easily.”

    DO:
    Opt for tailored pieces or show your silhouette with a belt.
    This season’s ’70s fever has had the fashion world obsessing over floaty maxi frocks and palazzo pants, but you need to keep your silhouette in mind: “Billowy, relaxed pieces are often very chic, but unless you’re a six-foot (1.83m) tall supermodel, they rarely look amazing in photographs,” Kerr said.
    “Instead of trapeze tops or slouchy, shapeless frocks, look for structured pieces like a well-cut blazer, ideally in a dark neutral hue (like black, navy, or charcoal) worn over a colorful blouse or dress.”

    DO:
    Wear slightly more make-up than usual.
    Once you’ve got the camera-friendly fashion sussed, don’t forget the big picture. Make sure you’ve got your make-up wardrobe at the ready too.
    “You don’t need to go for an over-the-top runway look, but be sure to do a little extra grooming when you know your picture will be taken,” Kerr said.
    “A bright lip gloss and lots of mascara are definite musts - and don’t forget the blush for extra radiance.”

    xoxo

    A quote not to miss....

    Life should NOT be a journey to the grave with the intention of arriving safely in an attractive and well-preserved body, but rather to skid in sideways, covered in scars, body thoroughly used up, totally worn out and screaming, ‘Yahoo! what a ride’”
    - Bear Grylls


    When I read this quote, it was an eye opening moment for me. Every time I go on a roller coaster, I tend to close my eyes and just scream! But then I remembered this quote and I made myself open my eyes, look at what is coming in front of me and let me say, it was an eye opener…literally!

    Then i thought to myself, have I been through life with my eyes closed? The answer was YES! What was I thinking??? I have been avoiding a lot of things right in front of me by just ignoring them or closing one eye, as they would say. From then on, I have gone though life with an open attitude.Live life, love those around you and embrace life as it is.

    So with that, I am starting this blog with my eyes wide open, on the look out for things that I love, that makes me laugh and things that just give me that butterfly feeling in my stomach. I wish to share everything with you in hopes that you will be inspired to be positive, love, laugh with me as I go through a gift called life.

    xoxo